Packet Filtering

Home > Quickstart > Packet Filtering


Packet Filtering |
|
|
Home > Quickstart > Packet Filtering |
|
|
|
The Network Analyzer offers two types of packet filters. One capture filter per document and one view filter per view. Packets not passing the capture filter will be lost while the view filter will only hide but not remove these packets from the storage. You can look up an overview of the data flow through the application in the reference section. |
|
|
As the Settings dialog
for both types of filters is almost the same, we'll take only a look at
the view filter here. So open a
data file or collect some packets
first. If you just collected packets, you should stop collecting now.
Otherwise the view filter will only be applied to new packets coming in
but not to already visible ones. Though if you stop collecting later,
all packets will be filtered then. Now click the View Filter button Note: Unlike the view filter, the capture filter is only available for newly created documents as you cannot collect packets into documents loaded from disk. Use the Collect > Capture Settings menu command to open the Settings dialog for the capture filter. |
|
|
Go to the Protocol
Type Filter page in the Settings
dialog by clicking the corresponding button
Now move the Settings dialog until you can see the Type column of the packet list view together with the dialog (the Settings dialog can be resized). Scroll the right (Protocols) column of the dialog to a protocol which is present in the packet list. Alternatively you can click into the protocol list and type the first letters of a protocol name on the keyboard (e.g. h-t for HTTP). Uncheck the protocol entry in the list and click the Apply button. The corresponding packets in the packet list view will disappear. You can try this with other protocols, too. If you have finished, click the Check all button to reset the filter to its initial state and click Apply. With the customizable Protocol Groups tree on the left you can even enable or disable multiple protocols at once. See Protocol Filter Settings for more details. |
|
|
Now open the MAC Address
Filter page by clicking the pink button Note: If not all entries in the dialog's page list are visible, you can scroll it by clicking the little arrow buttons or right-click into the list to get a context menu, which allows to switch between large and small icons.
Move the Settings dialog until you see the MAC Src. and MAC Dest. column
of the packet list view. In the Addresses list of the filter dialog select
an address entry, which is also present in the MAC Src. column. Now click
the upper right arrow button |
|
|
To remove the view filter click the Remove View Filter button |
Now you may want to save the collected packets for later use. See the next page for this topic.

 , use the View > View Filter menu command, or press F10
on the keyboard.
, use the View > View Filter menu command, or press F10
on the keyboard.
 on the
left.
on the
left.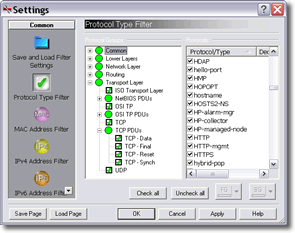

 on the left.
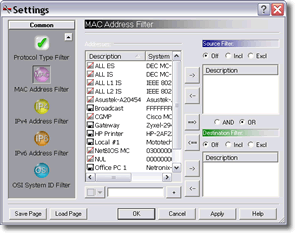
 in the dialog. The selected
address appears in the Source Filter list, and the Incl option becomes
highlighted (if Off was selected before). Click the Excl option instead
and close the dialog with the OK button. All packets with the corresponding
source address will disappear from the packet list. Take a look at the
in the dialog. The selected
address appears in the Source Filter list, and the Incl option becomes
highlighted (if Off was selected before). Click the Excl option instead
and close the dialog with the OK button. All packets with the corresponding
source address will disappear from the packet list. Take a look at the

 , use the View > Remove View Filter menu command, or press
Ctrl+F10 on the keyboard. All packets will reappear. If you open the view
filter dialog again, you will be taken to the same page that was open
the last time. Also the address filter settings are initialized to the
same values. So you can reapply the previous filter just by clicking OK.
To reset the filter settings, go to the
, use the View > Remove View Filter menu command, or press
Ctrl+F10 on the keyboard. All packets will reappear. If you open the view
filter dialog again, you will be taken to the same page that was open
the last time. Also the address filter settings are initialized to the
same values. So you can reapply the previous filter just by clicking OK.
To reset the filter settings, go to the  and click Reset All.